How to Replace Parts in Bitcoin Miner S19k Pro?
The Bitcoin Miner S19k Pro is a powerhouse in the world of cryptocurrency mining, offering unmatched performance, energy efficiency, and reliability. However, like any sophisticated piece of hardware, it requires regular maintenance to ensure it operates at peak efficiency. One of the key aspects of maintaining your S19k Pro is knowing how to replace its parts when necessary. Whether it’s a fan, hashboard, or power supply unit, understanding the process can save you time, money, and downtime. This guide will walk you through the steps to replace parts in your S19k Pro, ensuring your mining operations remain uninterrupted and profitable.
Introduction to the Bitcoin Miner S19k Pro
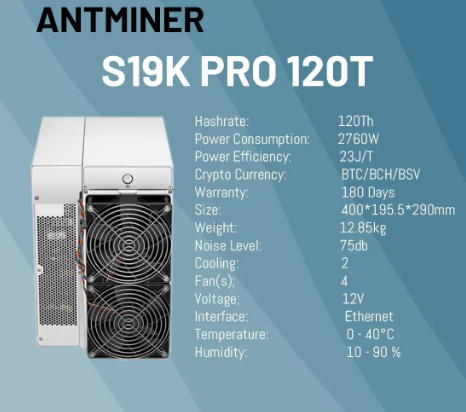
Before diving into the specifics of part replacement, let’s briefly recap what makes the S19k Pro a top choice for miners. Manufactured by Bitmain, a leader in the cryptocurrency mining industry, the S19k Pro boasts a hashrate of 120 TH/s and an impressive power efficiency of 23 J/TH. This means it delivers exceptional computational power while keeping energy consumption low, maximizing profitability.
The miner is designed with durability and ease of use in mind. Its compact and sturdy construction ensures it can withstand the rigors of continuous operation, even in challenging environments. Additionally, its modular design makes maintenance and part replacement straightforward, minimizing downtime.
Why Part Replacement is Essential for Your S19k Pro
Cryptocurrency mining is a demanding process that puts significant stress on mining equipment. Over time, components like fans, hashboards, and power supply units (PSUs) can wear out or fail due to prolonged use or environmental factors. Replacing these parts promptly is crucial for several reasons:
- Maintaining Optimal Performance: Faulty or worn-out parts can reduce the miner’s efficiency and hashrate, directly impacting profitability.
- Preventing Costly Downtime: A malfunctioning miner can lead to extended downtime, resulting in lost revenue.
- Extending the Miner’s Lifespan: Regular maintenance and part replacement can significantly prolong the operational life of your S19k Pro.
Common Parts That May Need Replacement
Here are the key components of the S19k Pro that may require replacement over time:
- Fans: The S19k Pro relies on high-performance fans to maintain optimal operating temperatures. Dust accumulation or mechanical wear can cause fans to fail.
- Hashboards: These are the heart of the miner, responsible for performing the complex calculations required for mining. Hashboards can degrade due to overheating or electrical issues.
- Power Supply Unit (PSU): The PSU converts AC power to DC power for the miner. A failing PSU can cause instability or complete shutdown.
- Control Board: This board manages communication between hardware components and the mining pool. Issues with the control board can disrupt mining operations.
- Cables and Connectors: Loose or damaged cables can cause connectivity issues, leading to reduced performance.
Step-by-Step Guide to Replacing Parts in the S19k Pro
Replacing parts in the S19k Pro is a straightforward process if you follow the correct steps. Below, we’ll walk you through the replacement of some of the most common components.
1. Replacing the Fans
Step 1: Power Down the Miner Unplug the miner from the power source to ensure safety during the replacement process.
Step 2: Open the Miner Case Using a screwdriver, remove the screws securing the outer case. Carefully lift the case to expose the internal components.
Step 3: Locate the Faulty Fan The S19k Pro has multiple fans. Identify the one that’s malfunctioning by checking for unusual noise or lack of airflow.
Step 4: Disconnect and Remove the Fan Unplug the fan’s power connector from the control board. Unscrew the fan from its mounting bracket and remove it.
Step 5: Install the New Fan Secure the new fan in place using the screws. Reconnect the power connector to the control board.
Step 6: Reassemble the Miner Replace the outer case and tighten the screws. Plug the miner back into the power source and test the new fan.
2. Replacing the Hashboards
Step 1: Power Down and Open the Miner As with fan replacement, start by unplugging the miner and opening the case.
Step 2: Locate the Faulty Hashboard Identify the hashboard that’s causing issues. This can usually be determined through error messages or reduced hashrate.
Step 3: Disconnect the Hashboard Carefully unplug all cables connected to the hashboard, including power and data connectors.
Step 4: Remove the Hashboard Unscrew the hashboard from the mounting bracket and gently slide it out.
Step 5: Install the New Hashboard Insert the new hashboard into the slot and secure it with screws. Reconnect all cables.
Step 6: Reassemble and Test Close the miner’s case and plug it back in. Monitor the miner to ensure the new hashboard is functioning correctly.
3. Replacing the Power Supply Unit (PSU)
Step 1: Power Down the Miner Always disconnect the miner from the power source before working on the PSU.
Step 2: Open the Miner Case Remove the screws and open the case to access the PSU.
Step 3: Disconnect the PSU Unplug all cables connected to the PSU, including the AC input and DC output cables.
Step 4: Remove the Old PSU Unscrew the PSU from the mounting bracket and carefully remove it.
Step 5: Install the New PSU Secure the new PSU in place using the screws. Reconnect all cables.
Step 6: Reassemble and Test Close the case, plug in the miner, and power it on. Monitor the PSU to ensure it’s functioning properly.
Tips for Successful Part Replacement
- Use Genuine Parts: Always use genuine Bitmain parts or high-quality replacements to ensure compatibility and reliability.
- Handle Components Carefully: Avoid static discharge by using an anti-static wrist strap when handling sensitive components like hashboards.
- Keep the Miner Clean: Regularly clean dust and debris from the miner to prevent overheating and component failure.
- Follow Manufacturer Guidelines: Refer to the S19k Pro user manual for specific instructions and safety precautions.
Where to Source Replacement Parts
When replacing parts in your S19k Pro, it’s essential to source them from reputable suppliers. Minerfixes, a trusted provider of mining solutions, offers a comprehensive range of spare parts and accessories for the S19k Pro. From fans and hashboards to PSUs and control boards, Minerfixes provides high-quality components that ensure your miner continues to operate at peak performance.
Conclusion
The Bitcoin Miner S19k Pro is a robust and efficient mining device, but like any hardware, it requires regular maintenance to stay in top condition. By understanding how to replace key components, you can minimize downtime, maintain optimal performance, and extend the lifespan of your miner. Whether you’re replacing a fan, hashboard, or PSU, following the steps outlined in this guide will help you keep your S19k Pro running smoothly and profitably.
Investing in quality replacement parts and performing regular maintenance is not just about fixing issues—it’s about ensuring your mining operations remain competitive in the ever-evolving world of cryptocurrency. So, equip yourself with the knowledge and tools to keep your S19k Pro in prime condition, and enjoy consistent returns from your mining endeavors.